Tutorial: Create your own models: Difference between revisions
| (4 intermediate revisions by the same user not shown) | |||
| Line 17: | Line 17: | ||
4. The VTFEdit utility to covert Textures to VTF format and create the associated .VMT file (link below) <br /> | 4. The VTFEdit utility to covert Textures to VTF format and create the associated .VMT file (link below) <br /> | ||
5. Valve model building utility, studiomdl.exe. (located in the ../empires/bin folder)<br /> | 5. Valve model building utility, studiomdl.exe. (located in the ../empires/bin folder)<br /> | ||
6. Model checking utility. [https://www.wunderboy.org/downloads/mdltextureinfo_1-0-zip/ WunderBoy mdltextureinfo utility]<br /> | 6. Texture baking knowledge. (Turn multiple textures in to a single texture map)<br /> | ||
7. Model checking utility. [https://www.wunderboy.org/downloads/mdltextureinfo_1-0-zip/ WunderBoy mdltextureinfo utility]<br /> | |||
The model check utility examines the final .mdl file and tells what textures are expected and their locations relative to the ./empires game folder. | The model check utility examines the final .mdl file and tells what textures are expected and their locations relative to the ./empires game folder. | ||
This can be very helpful when trying to troubleshoot missing texture problems. Follow the included readme file for install instructions. | This can be very helpful when trying to troubleshoot missing texture problems. Follow the included readme file for install instructions. | ||
| Line 52: | Line 53: | ||
[http://developer.valvesoftware.com/wiki/Exporting_a_model Valve developer tutorial - How to export models] | [http://developer.valvesoftware.com/wiki/Exporting_a_model Valve developer tutorial - How to export models] | ||
=== Create The Collision Model (Blender Specific) === | === Create The Collision Model (Blender Specific 2.5x and greater) === | ||
Not all models require a collision model. If your | Not all models require a custom collision model. The compiler will build a default collision model covering the model as one large block. If your model has more details that are important to player interaction, here are the basic steps to build a custom one using Blender. If using apps other than Blender, refer to the smoothing group details of your specific app. | ||
Build a very simple model out of six sided blocks and rectangles that overlay your model's parts. Make sure each block in your collision model is it's own object, do not make one large object containing many blocks. Create a new object/block for each detail and size them to fit over your model. It is OK to stretch and angle the block's form to better mimic the model's shape. Do not let these blocks touch or cross each other! Leave a very small gap between them. When all of your block objects are done and sized to fit your model details, move them as a group to their own separate layer for the next steps. | |||
If you've made a mistake and selecting one of the block objects highlights more than one block, the two must be separated. Select the multi-block object, go to edit mode, select a face, edge or vertices in the object, then L to highlight a single block (island in blender terms). Next hit P and click "separate by selection" to make the blocks separate objects. | |||
When the collision model is complete you will have a list of items called cube.001-00x. Don't worry about these yet. Now it's time to make a smooth group. One at a time for each of the objects you will be switching back an forth between object and edit modes. In object mode, select a block, switch to edit mode, highlight the entire block with A key, go to the "Shading/UV" and and choose Faces:Smooth button while in 3D view. Do not use the "Object Modifiers" Smooth option by mistake. That will not have the desired affect. When each object is smoothed it will display a slight change in appearance in the 3D view showing a successful smooth. | |||
You are now ready to export the | To group the list of smoothed object, go back to object mode, select one object and then and hit A key to choose all of the block objects. Make sure other objects are not selected by accident such as lights and cameras. Unwanted items can be deselected by toggling their arrow icon in the scene menu. | ||
When all are selected, hit "CTRL + J" to group the smoothed objects. Notice all of the cube.00x objects have now been combined in to one object with a single name. Now is the time to change the cube.00x name to the matching model name. "modelname_collision" for example | |||
You are now ready to export the modelnamee_collision.smd file using the blender smd plugin. Refer to the plugin information above. | |||
<br /> | <br /> | ||
Valve has very good but older tutorial that is Blender specific. It is basic information no matter which software is used. | Valve has very good but older tutorial that is Blender specific. It is basic information no matter which software is used. | ||
Latest revision as of 15:37, 11 February 2019
Home > Tutorial: Create your own models
Limitations and features of HL2 models
- One model can use 32 different textures and up to eight different LOD models.
- Faces without a texture specified will be ignored while compiling.
- Textures must be defined within their coesponding .VMT files as "VertexLitGeneric".
- Static entities can be added to the model, such as smokeemitters.
- 20 sub models can be defined for physics collision detection. (can be overwritten by $maxconvexpieces)
- Custom GIBS can be included that spawn on zero health and disappear after a while.
Item checklist for Empires model creation
1. 3D model editor to build the model and it's collision mesh. (Blender, 3DMax, XSI...)
2. Texture (Graphics) Editor. (gimp, mspaint, photoshop....)
3. Text editor to create the "QC" model build description file.
4. The VTFEdit utility to covert Textures to VTF format and create the associated .VMT file (link below)
5. Valve model building utility, studiomdl.exe. (located in the ../empires/bin folder)
6. Texture baking knowledge. (Turn multiple textures in to a single texture map)
7. Model checking utility. WunderBoy mdltextureinfo utility
  The model check utility examines the final .mdl file and tells what textures are expected and their locations relative to the ./empires game folder.
  This can be very helpful when trying to troubleshoot missing texture problems. Follow the included readme file for install instructions.
These are the basics needed to complete and put a model in Empires.
If this is your first experience with model making, the learning curve may be steep, but you can do it!
There are endless internet and youtube video tutorials on most of these topics to help.
How to create your own models for Empires
Setup
Set up a folder to place your project files and materials. I used VTFEdit and converted the .VTF 's to TGA 's, because your model editor may don't know the VTF format. Make sure you used the same filenames (except the ending, like .TGA ). To compile the model you don't need the VTF's, but you need them for proper rendering ingame.
Brushes and models use different texture shaders, and models can only use VertexLitGeneric shaders. Each texture has an individual VMT file that contains information about the shader to use, which is always the first line. If parts of your model are invisible and you getting warnings in the console your possible not using VertexLitGeneric.
Create your model
You can use any model editors you wish. If you have not used 3D software before, there are many good internet and youtube sources to learn from.
- 3D Studio Max (Commercial)
- XSI (Freeware)
- Milkshape (Shareware)
- Misfit Model 3D (Freeware)
- Blender (Open Source) and the required addon. --> SMD Export Utility
- Google Sketchup with Playup Tools (Freeware) (Untested. Please give feedback or opinions on the forum)
If you work with Solidworks, it's also possible to build a model, export as a .obj file, then convert the object file to SMD with one of the other free apps.
- Solidworks (Commercial) .obj export plugin
When your model is complete it will need to be saved in SMD file format. Research plugins if you don't have native SMD support in your editor.
Valve developer tutorial - Model Creation
Valve developer tutorial - How to export models
Create The Collision Model (Blender Specific 2.5x and greater)
Not all models require a custom collision model. The compiler will build a default collision model covering the model as one large block. If your model has more details that are important to player interaction, here are the basic steps to build a custom one using Blender. If using apps other than Blender, refer to the smoothing group details of your specific app.
Build a very simple model out of six sided blocks and rectangles that overlay your model's parts. Make sure each block in your collision model is it's own object, do not make one large object containing many blocks. Create a new object/block for each detail and size them to fit over your model. It is OK to stretch and angle the block's form to better mimic the model's shape. Do not let these blocks touch or cross each other! Leave a very small gap between them. When all of your block objects are done and sized to fit your model details, move them as a group to their own separate layer for the next steps.
If you've made a mistake and selecting one of the block objects highlights more than one block, the two must be separated. Select the multi-block object, go to edit mode, select a face, edge or vertices in the object, then L to highlight a single block (island in blender terms). Next hit P and click "separate by selection" to make the blocks separate objects.
When the collision model is complete you will have a list of items called cube.001-00x. Don't worry about these yet. Now it's time to make a smooth group. One at a time for each of the objects you will be switching back an forth between object and edit modes. In object mode, select a block, switch to edit mode, highlight the entire block with A key, go to the "Shading/UV" and and choose Faces:Smooth button while in 3D view. Do not use the "Object Modifiers" Smooth option by mistake. That will not have the desired affect. When each object is smoothed it will display a slight change in appearance in the 3D view showing a successful smooth.
To group the list of smoothed object, go back to object mode, select one object and then and hit A key to choose all of the block objects. Make sure other objects are not selected by accident such as lights and cameras. Unwanted items can be deselected by toggling their arrow icon in the scene menu. When all are selected, hit "CTRL + J" to group the smoothed objects. Notice all of the cube.00x objects have now been combined in to one object with a single name. Now is the time to change the cube.00x name to the matching model name. "modelname_collision" for example
You are now ready to export the modelnamee_collision.smd file using the blender smd plugin. Refer to the plugin information above.
Valve has very good but older tutorial that is Blender specific. It is basic information no matter which software is used.
Collision Mesh Tutorial for Blender
Prepare for compiling
 |
| |||||
 |
| ||
 |
| ||||
example content of Empires.qc
//modelname and folder
$modelname "NF/Buildings/radar/NF_radar.mdl"
//LOD
$model "base" "reference.smd"
$lod 300
{
 replacemodel "reference" "lod1_reference"
}
$model "inside" "inside.smd"
$lod 100
{
replacemodel "inside" "lod1_inside"
}
$lod 300
{
replacemodel "inside" "lod2_inside"
}
$model "crates" "crates.smd"
$lod 100
{
replacemodel "crates" "lod1_crates"
}
$lod 300
{
 replacemodel "crates" "lod2_crates"
}
$cdmaterials "NF\Buildings\"
$cdmaterials "Common\Glass\"
$cdmaterials "\common\props"
$cdmaterials "NF\Props\"
$cdmaterials "NF\Buildings\Radar\"
$cdmaterials "\"
$cdmaterials "\metal"
//hitbox
$hboxset "default"
$hbox 0 "static_prop" -351.416  -352.793  -140.800  379.501  351.355  405.290
//attached entities
$attachment "build" "static_prop" 0.00 0.00 0.00 rotate 0.00 90.00 0.00
$attachment "smoke_damage_1" "static_prop" -176.00 -38.50 198.00 rotate 0.00 90.00 0.00
$attachment "smoke_damage_2" "static_prop" -0.00 299.20 132.00 rotate 0.00 90.00 0.00
$attachment "smoke_damage_3" "static_prop" 19.80 -88.00 330.00 rotate 0.00 90.00 0.00
$surfaceprop "default"
$illumposition 14.043 -0.719 132.245
//animation sequence
$sequence idle "idle" fps 1.00
$collisionmodel "phymodel.smd" {
$concave
$mass 180.0
$inertia 1.00
$damping 0.00
$rotdamping 0.00
}
//scale the model by this factor
$scale 1.0
explanation of Empires.qc
$modelname is the path and name of your model as mdl. The model nf_radar.mdl will be placed in .\Steam\steamapps\SourceMods\Empires\nf\buildings\radar\nf_radar.mdl after compiling.
$cdmaterials is the path to your materials (VTF 's) in the .\materials folder. If you use more than 1 folder, you can use the '$cdmaterials' command again to set the remaining folders (this includes subfolders).
$scale Scales your model by this factor.
$body main-smd
$sequence smd with animation
$staticprop for prop_static, Be careful, models compiled with $staticprop don't cast shadows !
$collisionmodel smd file with a collisionmodel
Before you compile
Check following points:
- Collisionmodel: Compiling without including a separate collision mesh will result in one solid mesh roughly the same size as the model. Concave features, openings or holes in the model will not be recognized automatically. When building the very sparse collision model, place the submodel objects very close to each other but do not overlap them. If this is not done correctly the build will default back to one single solid physics collision model.
- Textures: Create your model and texture all faces. Faces without a proper texture mapping will be ignored while compiling and won't occur in game. If you don't care about texturing, apply any name, HL2 wont find the texture and will apply the deafult purple-black chess texture. Finally save your model as SMD-file.
What your SMD-file should look like:
texturename1
0 101.417053 -13.837116 6.270448 -0.673222 0.446155 0.589677 0.000000 1.000000 0
0 106.823196 -11.187776 6.270448 -0.161431 0.795829 0.583607 0.000000 0.000000 0
0 101.342369 -13.836076 2.145702 -0.652646 0.757568 0.012008 1.000000 0.000000 0
texturename2
0 106.823196 -11.187776 6.270448 -0.161431 0.795829 0.583607 0.000000 1.000000 0
0 106.748520 -11.186735 2.145702 0.074252 0.997239 -0.001093 0.000000 0.000000 0
0 101.342369 -13.836076 2.145702 -0.652646 0.757568 0.012008 1.000000 0.000000 0
What your SMD-file look like if your faces have no texture:
0 101.417053 -13.837116 6.270448 -0.673222 0.446155 0.589677 0.000000 1.000000 0
0 106.823196 -11.187776 6.270448 -0.161431 0.795829 0.583607 0.000000 0.000000 0
0 101.342369 -13.836076 2.145702 -0.652646 0.757568 0.012008 1.000000 0.000000 0

0 106.823196 -11.187776 6.270448 -0.161431 0.795829 0.583607 0.000000 1.000000 0
0 106.748520 -11.186735 2.145702 0.074252 0.997239 -0.001093 0.000000 0.000000 0
0 101.342369 -13.836076 2.145702 -0.652646 0.757568 0.012008 1.000000 0.000000 0
- Convert all textures to the vtf format, create the appropriate vmt file with VertexLitGeneric shaders (see .QC file above), and place all files in the folder specified in the QC file.
- Make sure your model editor created a valid SMD file. There is some difficulty with XSI Demo which saves only 2 different textures and 'forgets' all others.
- The SMD plugin for Blender versions 2.69 and above work, but problems have been reported with earlier versions of Blender.
- Milkshape is also a good solution, always reliable at creating SMDs.
- Your model needs at least one (empty) animation, that is called "idle".
- Your model needs at least one bonejoint, more if you want to use animations.
Compile your model
Start Steam and make sure Empires isn't running.
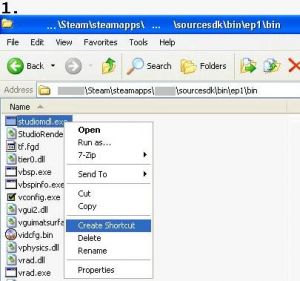
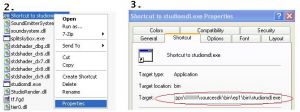
Execute your created shortcut to studiomdl. studiomdl will read the Empires.qc and compile your smd-files to mdl format and place it in the specified folder. To see the output of studiomdl.exe open the command shell and drag&drop the shotcut to it.
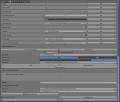
Blender specific SMD export plugin sample setting
This sample shows blender using the Team Fortress 2 tool path.
The Empires tool should work also, but when it didn't the TF2 path did.
Links
- http://developer.valvesoftware.com/wiki/Compiling_Models_Basics
- http://developer.valvesoftware.com/wiki/Model_Creation_Overview
- http://developer.valvesoftware.com/wiki/Exporting_a_model
- http://developer.valvesoftware.com/wiki/3D_Modeling_Programs
- http://www.hl2world.com/wiki/index.php/Creating_Breakable_Models
- http://developer.valvesoftware.com/wiki/Prop_data
- http://developer.valvesoftware.com/wiki/Multiple_Skins_for_a_Single_Model


