Tutorial: Create your own models
Home > Tutorial: Create your own models
Programs / Files you'll need
1. You need at least one textured model in the SMD format.
2. Your textures with a power of 2 saved as VTF.
3. A QC file, can be created with any texteditor like notepad.
4. studiomdl.exe , install source SDK to get this file.
How to create your own models for Empires
Setup
Set up a folder to place your project files and materials. I used VTFEdit and converted the .VTF 's to TGA 's, because your model editor may don't know the VTF format. Make sure you used the same filenames (except the ending, like .TGA ). To compile the model you'll need the VTF's !
Create your model
You can use any model editors like
- 3D Studio Max (Commercial)
- XSI (Freeware)
- Milkshape (Shareware)
- Misfit Model 3D (Freeware)
- Blender (Open Source)
- Google Sketchup with Playup Tools (Freeware) (Untested. Please give feedback or opinions on the forum)
but you need to convert your model to a SMD file at the end. Try to get plugins if you don't have native SMD support in your editor.
Create your model and texture all faces. Faces without a proper texture mapping will be ignored while compiling and won't occur in game. Finally save your model as SMD-file.
What your SMD-file should look like:
texturename1
0 101.417053 -13.837116 6.270448 -0.673222 0.446155 0.589677 0.000000 1.000000 0
0 106.823196 -11.187776 6.270448 -0.161431 0.795829 0.583607 0.000000 0.000000 0
0 101.342369 -13.836076 2.145702 -0.652646 0.757568 0.012008 1.000000 0.000000 0
texturename2
0 106.823196 -11.187776 6.270448 -0.161431 0.795829 0.583607 0.000000 1.000000 0
0 106.748520 -11.186735 2.145702 0.074252 0.997239 -0.001093 0.000000 0.000000 0
0 101.342369 -13.836076 2.145702 -0.652646 0.757568 0.012008 1.000000 0.000000 0
What your SMD-file look like if your faces have no texture:
0 101.417053 -13.837116 6.270448 -0.673222 0.446155 0.589677 0.000000 1.000000 0
0 106.823196 -11.187776 6.270448 -0.161431 0.795829 0.583607 0.000000 0.000000 0
0 101.342369 -13.836076 2.145702 -0.652646 0.757568 0.012008 1.000000 0.000000 0

0 106.823196 -11.187776 6.270448 -0.161431 0.795829 0.583607 0.000000 1.000000 0
0 106.748520 -11.186735 2.145702 0.074252 0.997239 -0.001093 0.000000 0.000000 0
0 101.342369 -13.836076 2.145702 -0.652646 0.757568 0.012008 1.000000 0.000000 0
Valve developer tutorial - Model Creation
Valve developer tutorial - How to export models
Prepare for compiling
 |
| |||||
 |
| ||
 |
| ||||
example content of Empires.qc
$modelname nf\buildings\radar\nf_radar.mdl
$cdmaterials nf\buildings
$staticprop
$scale 10.0
$body studio "nf_radar.smd"
$sequence idle "nf_radar.smd" fps 30
$collisionmodel "nf_radar.smd" {
$Mass 20
}
explanation of Empires.qc
$modelname is the path and name of your model as mdl. The model nf_radar.mdl will be placed in .\Steam\steamapps\SourceMods\Empires\nf\buildings\radar\nf_radar.mdl after compiling.
$cdmaterials is the path to your materials (VTF 's) in the .\materials folder. Here it's .\Steam\steamapps\SourceMods\Empires\materials\nf\buildings. If you use more than 1 folder, set '$cdmaterials \ ' and edit your SMD file. You need to add the folder to each texture where it is located. change each line from
texturename1
0 101.417053 -13.837116 6.270448 -0.673222 0.446155 0.589677 0.000000 1.000000 0
...
to
\folder1\folder2\texturename
0 101.417053 -13.837116 6.270448 -0.673222 0.446155 0.589677 0.000000 1.000000 0
...
$scale Scales your model by this factor.
$body main-smd
$sequence smd with animation
$collisionmodel smd file with a collisionmodel
Compile your model
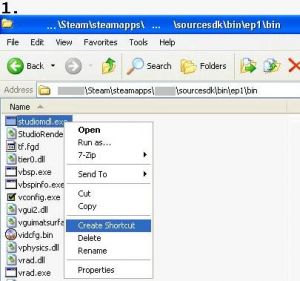
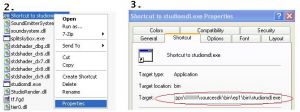
Execute your created shortcut to studiomdl. studiomdl will read the Empires.qc and compile your smdfile to mdl format and place it in the specified folder. To see the output of studiomdl.exe open the command shell and drag&drop the shotcut to it.
Links
http://developer.valvesoftware.com/wiki/Compiling_Models_Basics
http://developer.valvesoftware.com/wiki/Model_Creation_Overview
http://developer.valvesoftware.com/wiki/Exporting_a_model
http://developer.valvesoftware.com/wiki/3D_Modeling_Programs


