Map:emp mvalley: Difference between revisions
BlackRedDead (talk | contribs) |
No edit summary |
||
| Line 1: | Line 1: | ||
{{Sitenav|[[Maps]] > emp_mvalley }} | {{Sitenav|[[Maps]] > emp_mvalley }} | ||
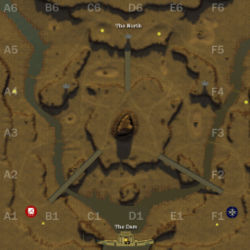
[[Image:mvalley_minimap.jpg|thumb|right|250px|Minimap of Emp_Mvalley]] | [[Image:mvalley_minimap.jpg|thumb|right|250px|Minimap of Emp_Mvalley]] | ||
== | == General Map Information == | ||
== Commander Tactics == | == Commander Tactics == | ||
'''The north is a key area to hold.''' Getting a grip on the northern plateau gives a great defensive position from which to dominate the late game, and the financial boost from the double [[Resource Node|resource nodes]] can make all the difference once more expensive components are researched. The best way to take this position is to get there first, which often means rushing it with the [[Command Vehicle]] at the very start of a round. Get a barracks down as soon as possible, and you should be able to finance the development of both bases at once. Finally, don't neglect your starting base: it can prove valuable in flanking the enemy should they decide to assault your northern stronghold. It should be noted, however, that all is not lost for the team that fails to secure the north plateau. An offensive against this position may be difficult, so try and capture the rest of the map, choking the defenders and winning a war of attrition. | '''The north is a key area to hold.''' Getting a grip on the northern plateau gives a great defensive position from which to dominate the late game, and the financial boost from the double [[Resource Node|resource nodes]] can make all the difference once more expensive components are researched. The best way to take this position is to get there first, which often means rushing it with the [[Command Vehicle]] at the very start of a round. Get a barracks down as soon as possible, and you should be able to finance the development of both bases at once. Finally, don't neglect your starting base: it can prove valuable in flanking the enemy should they decide to assault your northern stronghold. It should be noted, however, that all is not lost for the team that fails to secure the north plateau. An offensive against this position may be difficult, so try and capture the rest of the map, choking the defenders and winning a war of attrition. | ||
== Squad Level Tactics == | == Squad Level Tactics == | ||
== Unit and Infantry Tactics == | == Unit and Infantry Tactics == | ||
'''Place [[Surveillance|surveillance structures]] near key choke points.''' A radar under each of the bridges can provide valuable intelligence about the movement of enemy | '''Place [[Surveillance|surveillance structures]] near key choke points.''' A camera and radar under each of the bridges can provide valuable intelligence about the movement of enemy units, giving your team enough time to set up an effective defence. If they're well-placed, using the contours of the ground and the supporting pillars as cover, they can sometimes remain hidden for the majority of a match. | ||
== Points of Interest == | == Points of Interest == | ||
[[Category:Maps|emp_mvalley]] | [[Category:Maps|emp_mvalley]] | ||
Revision as of 02:11, 3 July 2007
Home > Map:emp mvalley

General Map Information
Commander Tactics
The north is a key area to hold. Getting a grip on the northern plateau gives a great defensive position from which to dominate the late game, and the financial boost from the double resource nodes can make all the difference once more expensive components are researched. The best way to take this position is to get there first, which often means rushing it with the Command Vehicle at the very start of a round. Get a barracks down as soon as possible, and you should be able to finance the development of both bases at once. Finally, don't neglect your starting base: it can prove valuable in flanking the enemy should they decide to assault your northern stronghold. It should be noted, however, that all is not lost for the team that fails to secure the north plateau. An offensive against this position may be difficult, so try and capture the rest of the map, choking the defenders and winning a war of attrition.
Squad Level Tactics
Unit and Infantry Tactics
Place surveillance structures near key choke points. A camera and radar under each of the bridges can provide valuable intelligence about the movement of enemy units, giving your team enough time to set up an effective defence. If they're well-placed, using the contours of the ground and the supporting pillars as cover, they can sometimes remain hidden for the majority of a match.