Basic Conquest Map: Difference between revisions
No edit summary |
No edit summary |
||
| (55 intermediate revisions by 3 users not shown) | |||
| Line 1: | Line 1: | ||
{{MappingDocumentation}} | |||
==Overview== | |||
''Please ensure that you have [[Configuring Hammer for Empires|properly configured Hammer for Empires]] before proceeding.'' | |||
This guide is for showing you how to set up the conquest style map seen in maps such as Isle and Duststorm. This guide excludes the teaching of resource nodes and mini maps. Also remember that this tutorial is written in a way in which hammer n00bs can understand so if what is being talked about is to simple... skip it! | |||
1. Ok to start with, load up the source SDK (under "Tools" in steam) and open the Hammer Editor. This is the software used to create maps for any source-powered game. | |||
Upon loding your screen should look like this... | |||
[[Image:Step 1.png|medium|step 1]] | [[Image:Step 1.png|medium|step 1]] | ||
2. | 2. Create a new map by going 'File' -> 'New'. The screen should now look like this... | ||
[[Image:Step 2.png|medium|step 2]] | [[Image:Step 2.png|medium|step 2]] | ||
| Line 15: | Line 20: | ||
3. | 3. Now select the block tool on the left hand side. | ||
[[Image:Step 3.png|medium|step 3]] | [[Image:Step 3.png|medium|step 3]] | ||
| Line 21: | Line 26: | ||
4. | 4. Move your mouse to the 2D top view (the top right view) and use the mouse wheel to zoom in and out. To move the view, hold the space bar and drag with the left mouse button. When you are satisfied that you can navigate in this view, drag out a square using the left mouse button whilst the block tool is selected. Make it around 4096 by 4096 units. You will see a white outline where the block will be created. Press return on your keyboard to place the block. | ||
[[Image:Step 4.png|medium|step 4]] | [[Image:Step 4.png|medium|step 4]] | ||
| Line 27: | Line 32: | ||
5. After you have done this the box should appear in the 3D view (top left view) but thanks to a new update from steam | 5. After you have done this the box should appear in the 3D view (top left view) but thanks to a new update from steam, this might not work first time. To correct this, click the camera tool and then click on a 2D view then scroll out in the 3D view. | ||
[[Image:Step 5.png|medium|step 5]] | [[Image:Step 5.png|medium|step 5]] | ||
| Line 33: | Line 38: | ||
6. | 6. The next thing to do is to get used to moving around in the 3D view, there are two ways to equaly useful ways to do this. | ||
A) With the camera tool selected, click and hold the left mouse button in the 3D view. This rotates your view on the spot. The right mouse button moves your view left, right, up and down (relative to where you are looking). Holding both mouse buttons at once zooms the view in and out. | |||
B) No tool needs to be selected in this way of moving all you have to do is move your mouse into the 3D view and zoom in and out with the 'W' and 'S' keys and pan left and right with the 'A' and 'D' keys changing your direction with the arrow keys much like in spectator view on most source games only using arrow keys insted of the mouse. | |||
Once you are comfortable with moving around, move on to step 6.5. | |||
6.5. At this stage, your newly placed block will look like this. This is the default white texture. | |||
[[Image:Step 6.5.png|medium|step 6.5]] | |||
6.1. This makes it hard to see what you're doing, and doesn't look all that good either, so we are going to put a different texture on it. Half-Life 2 comes with many different textures, most of which can be used for this kind of object. In this case, I'm going to have it as grass. To find your texture, select browse at the right hand side. | |||
[[Image:Step 6.6.png|medium|step 6.6]] | |||
6.2. Now type in the filter "grass". | |||
[[Image:Step 6.7.png|medium|step 6.7]] | |||
6.3. Select the specific texture that you want by double clicking it. You will then be brought back to the editing screen, where you should now select your block and click the apply texture button. | |||
[[Image:Step 6.8.png|medium|step 6.8]] | |||
7. Now we are going to place some entities. These are what really make the map function. Some examples would be the baracks and the command vehicles. To begin, click the entity tool. | |||
[[Image:Step 7.png|medium|step 7]] | [[Image:Step 7.png|medium|step 7]] | ||
8. You will notice that when you do this, at the right hand side of the screen, two previously greyed out dropdown boxes will now become available. The top one is used to decide what you are placing (in this case, leave it on "Entities") and the bottom box chooses what you are placing out of that category. The other options relate to prefabs, and are not relevant to this tutorial. We will be using the bottom box to select the Brenodi barracks entity. This is named '''emp_building_imp_barracks'''. | |||
[[Image:Step 8.png|medium|step 8]] | |||
9. The easiest way to place entities in the map is via the 3D view. Clicking anywhere on your ground, a barracks should appear. Chances are, it hasn't been placed exactly how you want it (it is probably too high) so this means we will have to use the 2D views to position it how we want it. | |||
[[Image:Step 9.png|medium|step 9]] | |||
10. To move a object in the 2D view simply select it (by clicking on it in the 3D view), and drag it around. Notice it will snap to the grid. In order to change the grid size, use the '[' and ']' keys. This works exactly the same in all of the 2D views. | |||
11. Once you have positioned the Brenodi barracks where you want it, do the same with the NF one ('''emp_building_nf_barracks''')... | |||
[[Image:Step 11.png|medium|step 11]] | |||
12. Now we need to add the command vehicles ('''emp_imp_commander''') and ('''emp_nf_commander'''). This works exactly the same as the barracks, but leave them ever so slightly above the ground so that when the game starts they drop to the floor rather than being stuck in the ground. The Brenodi CV's front wheels will look all screwed up; dont worry, this will correct itself in-game. | |||
[[Image:Step 12.png|medium|step 12]] | |||
13. The next thing to now do is to make the sky box. For this tutorial we are going to be using a 2D skybox, as this is much simpler than a 3D one. Effectively all we are going to do is use the block tool to make a box around the map, and use the skybox tool texture on it to turn it into sky. I find it best to start making this from the edge of our map in the top view. | |||
[[Image:Step 13.png|medium|step 13]] | |||
14. Now you have one side of your skybox (untextured) but it is not the right height so you need to go into a different 2D view and begin resizing it. I would say that about 1087 units high would be enough, but keep in mind that the commander can only move inside this box. If it's too short, his view of the battle will be severely limited. Also remember that when making these bits it sometimes helps you later on to have blocks meet at corners rather then edges (as shown in bottem right 2D view). | |||
[[Image:Step 14.png|medium|step 14]] | |||
15. I think its a good time to tell you how to copy a block as this comes in useful when doing lots of brushwork. To copy a block, all you have to do is select it and drag it with your mouse in a 2D view whilst holding the shift key. Try doing this with the block we made in step 13. Also you can delete blocks you have made by selecting them and pressing the 'delete key' | |||
[[Image:Step 15.png|medium|step 15]] | |||
16. Now do the same with the other two sides. | |||
[[Image:Step 16.png|medium|step 16]] | |||
17. Now we need to add a ceiling, start by dragging a box in the top 2D view the same size and shape as the floor then bring it up to meet the corners of the side of your map. | |||
[[Image:Step 17.png|medium|step 17]] | |||
18. You will want to texture the ceiling and the walls, texture them as skyboxes this is done in the same way as how we textured the floor only you use the skybox texture search 'skybox' or 'tools' to find it. | |||
[[Image:Step 18.png|medium|step 18]] | |||
19. Next we need to add 'Emp_info_params' this a entity that tells hammer how many resources each team starts with, how many reinforcements each team has and various other things. When you place it it should appear as a red cube when selected and a purple cube when not selected. To edit the propities of it double click it in the 3D view. (Dont forget if you want to play this map set the resources quite high as resource nodes are not in this tutorial) | |||
[[Image:Step 19.png|medium|step 19]] | |||
20. Lastly we need to add 'emp_info_map_overview' this is also a entity and is selected in the same way as 'Emp_info_params' | |||
[[Image:Step 20.png|medium|step 20]] | |||
21. BONUS: Add an 'info_node' entity, so servers hosting your map don't need to generate AI node graphs. | |||
22. Dont forget that to play your map go to file- runmap and hit ok to compile! Have fun! | |||
end of tutorial | |||
Tutorial made by supaste with special thanks to Broccoli and other people who did corrections for me (add your name if i missed you) | |||
[[Category:Mapping|Basic Conquest Map]] | |||
Latest revision as of 19:12, 10 June 2009
| Empires Mapping Documentation |
| Mapping Overiew | Hammer Configuration | Entity Index | Basic Mapping | Setup Resources | Tutorials | Useful FGD Modifications | Bots and NPCs | Dimensions | Skyboxes |
Overview
Please ensure that you have properly configured Hammer for Empires before proceeding.
This guide is for showing you how to set up the conquest style map seen in maps such as Isle and Duststorm. This guide excludes the teaching of resource nodes and mini maps. Also remember that this tutorial is written in a way in which hammer n00bs can understand so if what is being talked about is to simple... skip it!
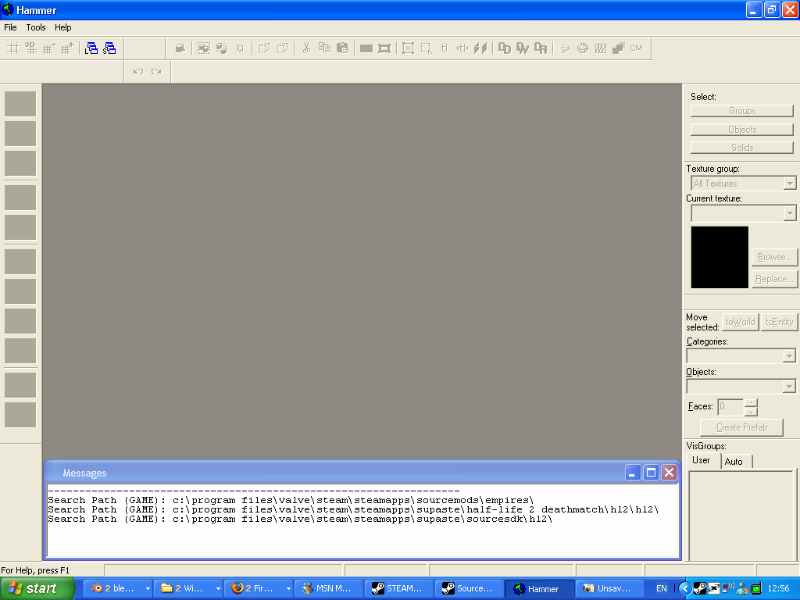
1. Ok to start with, load up the source SDK (under "Tools" in steam) and open the Hammer Editor. This is the software used to create maps for any source-powered game.
Upon loding your screen should look like this...
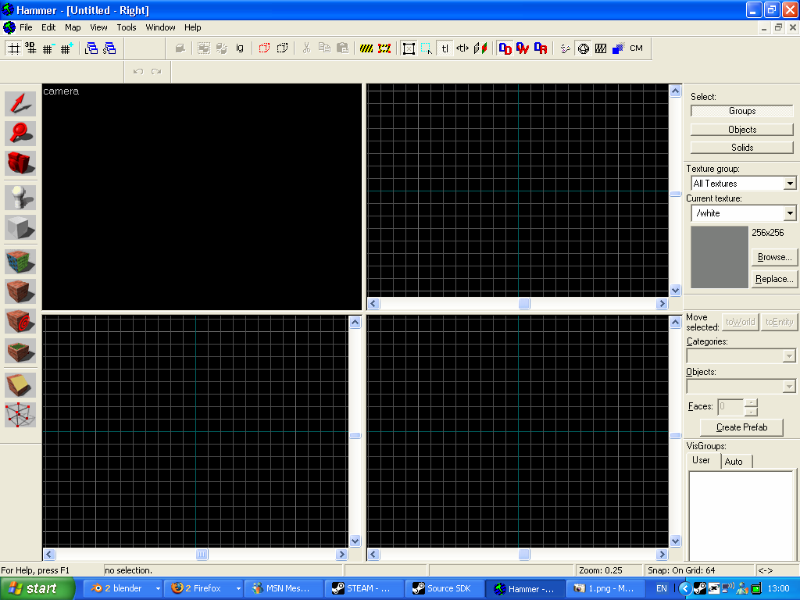
2. Create a new map by going 'File' -> 'New'. The screen should now look like this...
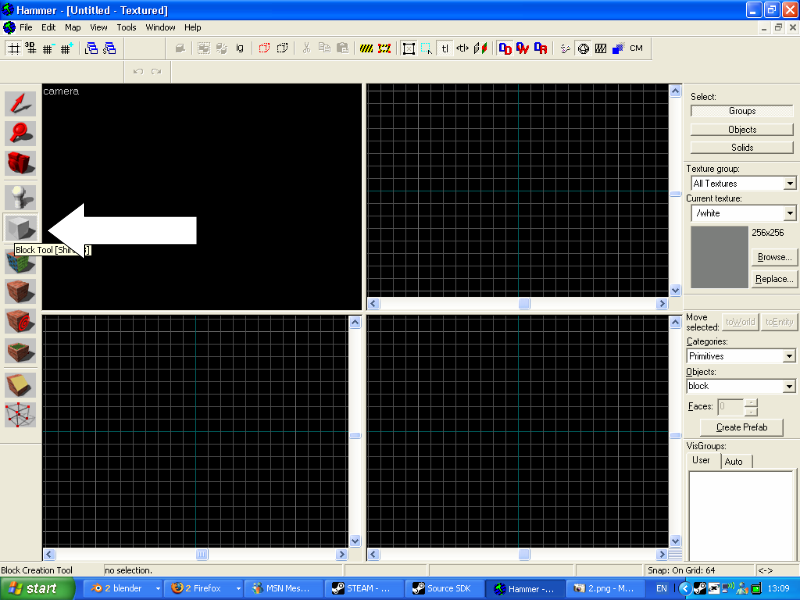
3. Now select the block tool on the left hand side.
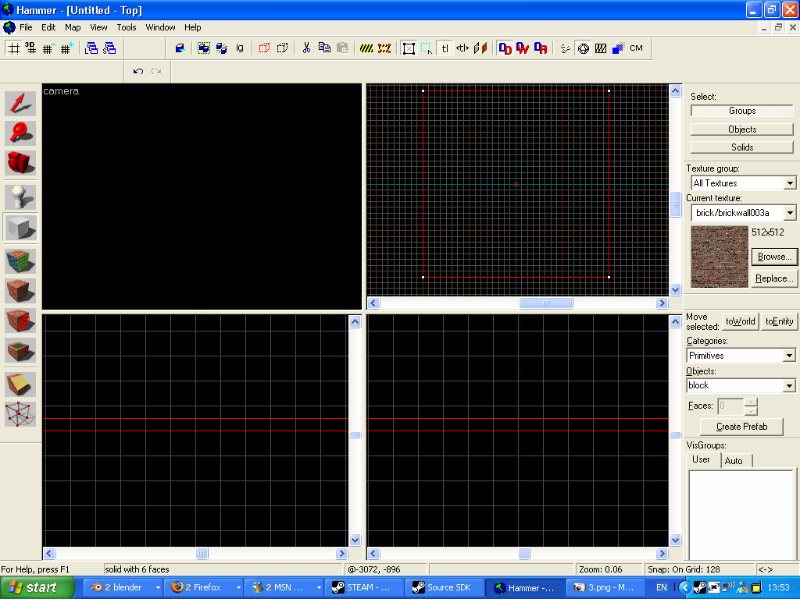
4. Move your mouse to the 2D top view (the top right view) and use the mouse wheel to zoom in and out. To move the view, hold the space bar and drag with the left mouse button. When you are satisfied that you can navigate in this view, drag out a square using the left mouse button whilst the block tool is selected. Make it around 4096 by 4096 units. You will see a white outline where the block will be created. Press return on your keyboard to place the block.
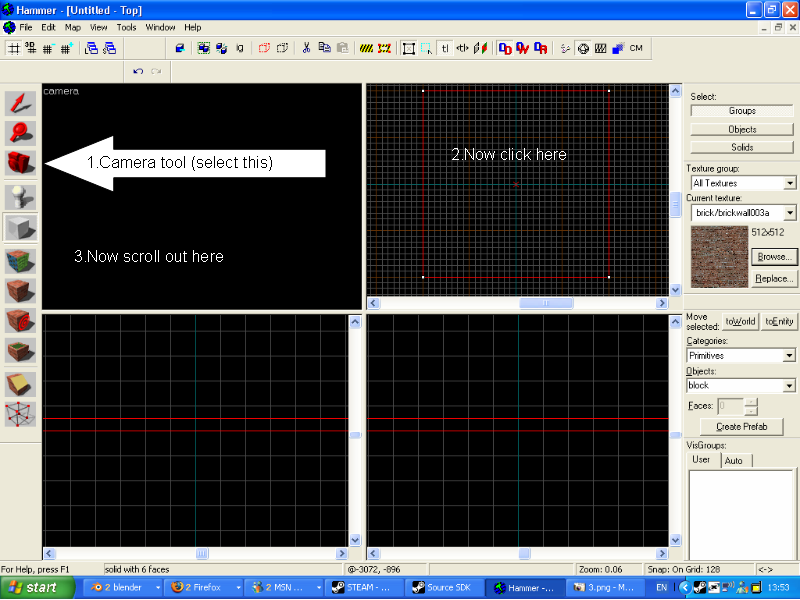
5. After you have done this the box should appear in the 3D view (top left view) but thanks to a new update from steam, this might not work first time. To correct this, click the camera tool and then click on a 2D view then scroll out in the 3D view.
6. The next thing to do is to get used to moving around in the 3D view, there are two ways to equaly useful ways to do this.
A) With the camera tool selected, click and hold the left mouse button in the 3D view. This rotates your view on the spot. The right mouse button moves your view left, right, up and down (relative to where you are looking). Holding both mouse buttons at once zooms the view in and out.
B) No tool needs to be selected in this way of moving all you have to do is move your mouse into the 3D view and zoom in and out with the 'W' and 'S' keys and pan left and right with the 'A' and 'D' keys changing your direction with the arrow keys much like in spectator view on most source games only using arrow keys insted of the mouse.
Once you are comfortable with moving around, move on to step 6.5.
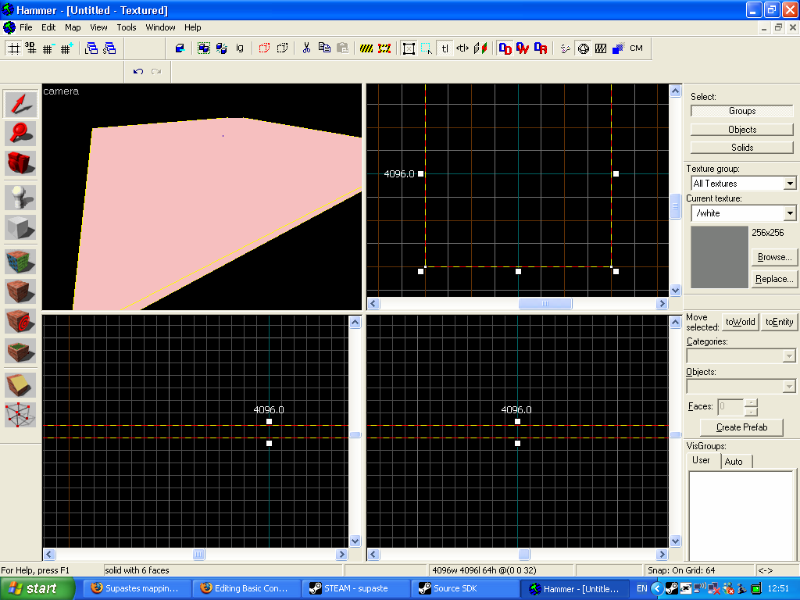
6.5. At this stage, your newly placed block will look like this. This is the default white texture.
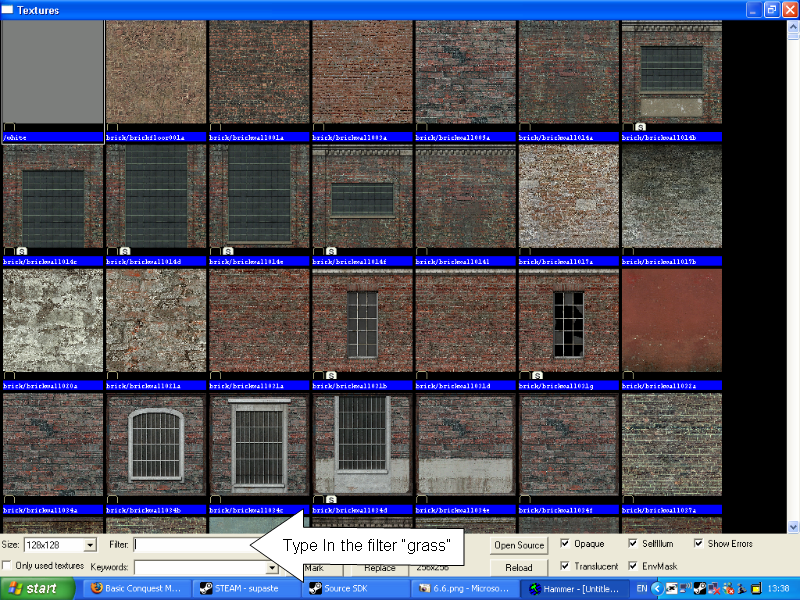
6.1. This makes it hard to see what you're doing, and doesn't look all that good either, so we are going to put a different texture on it. Half-Life 2 comes with many different textures, most of which can be used for this kind of object. In this case, I'm going to have it as grass. To find your texture, select browse at the right hand side.
6.2. Now type in the filter "grass".
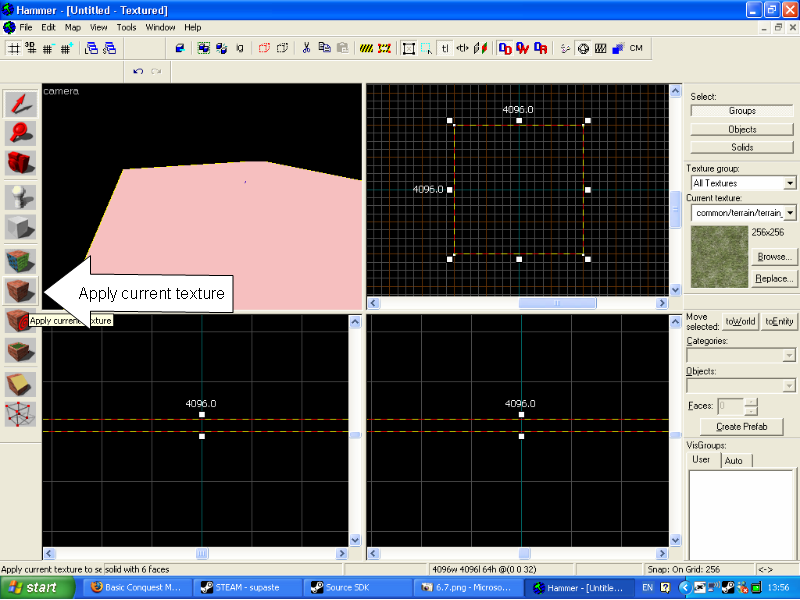
6.3. Select the specific texture that you want by double clicking it. You will then be brought back to the editing screen, where you should now select your block and click the apply texture button.
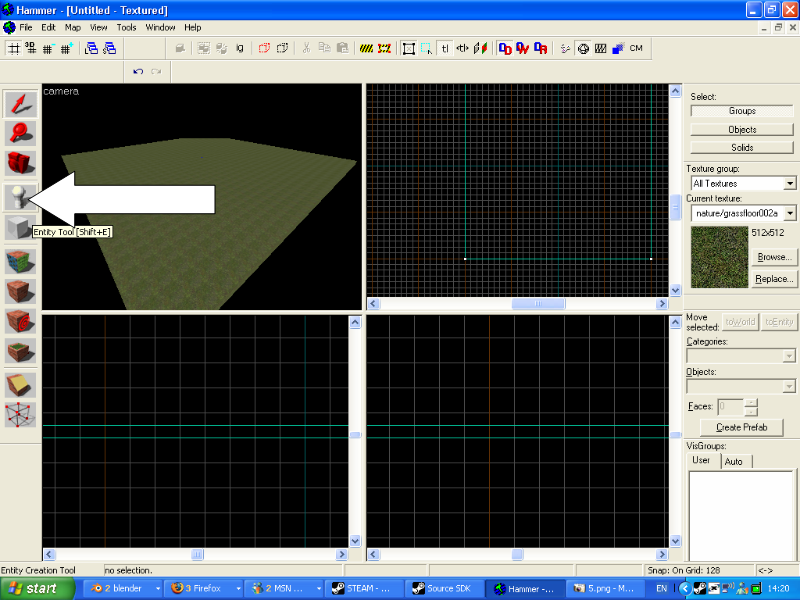
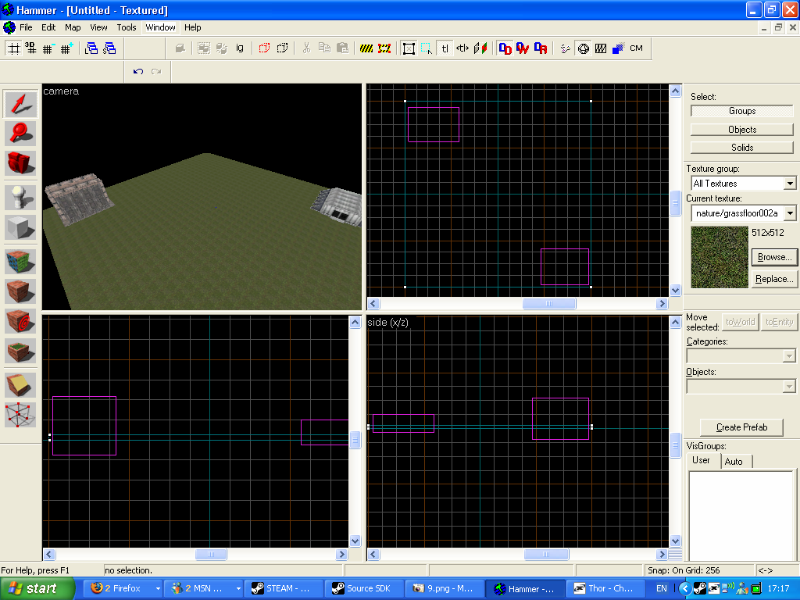
7. Now we are going to place some entities. These are what really make the map function. Some examples would be the baracks and the command vehicles. To begin, click the entity tool.
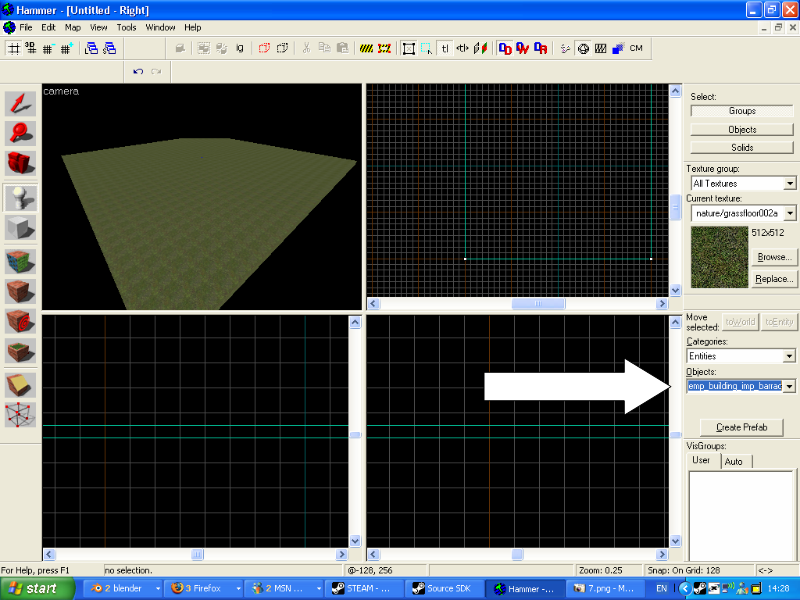
8. You will notice that when you do this, at the right hand side of the screen, two previously greyed out dropdown boxes will now become available. The top one is used to decide what you are placing (in this case, leave it on "Entities") and the bottom box chooses what you are placing out of that category. The other options relate to prefabs, and are not relevant to this tutorial. We will be using the bottom box to select the Brenodi barracks entity. This is named emp_building_imp_barracks.
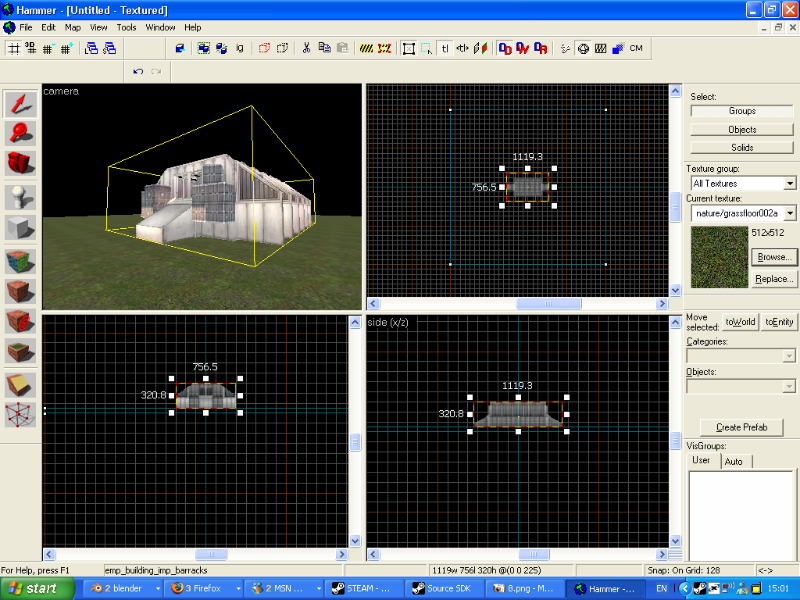
9. The easiest way to place entities in the map is via the 3D view. Clicking anywhere on your ground, a barracks should appear. Chances are, it hasn't been placed exactly how you want it (it is probably too high) so this means we will have to use the 2D views to position it how we want it.
10. To move a object in the 2D view simply select it (by clicking on it in the 3D view), and drag it around. Notice it will snap to the grid. In order to change the grid size, use the '[' and ']' keys. This works exactly the same in all of the 2D views.
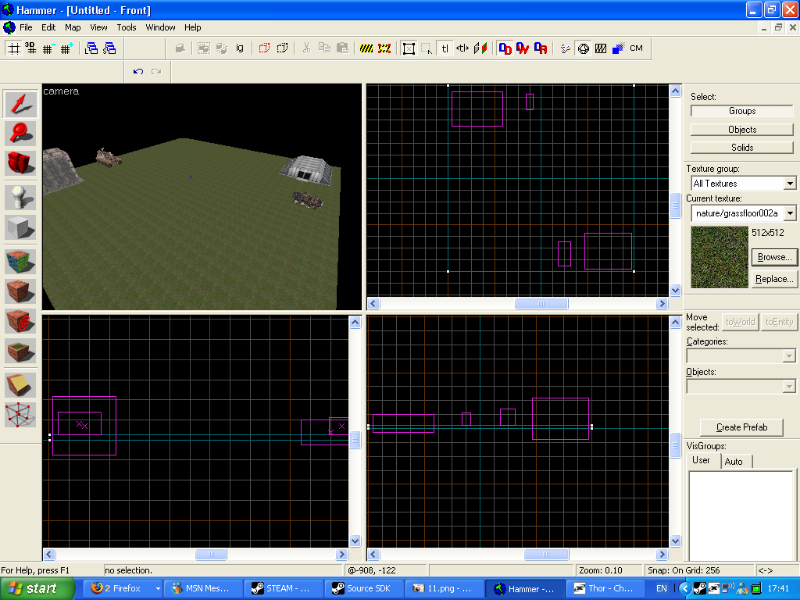
11. Once you have positioned the Brenodi barracks where you want it, do the same with the NF one (emp_building_nf_barracks)...
12. Now we need to add the command vehicles (emp_imp_commander) and (emp_nf_commander). This works exactly the same as the barracks, but leave them ever so slightly above the ground so that when the game starts they drop to the floor rather than being stuck in the ground. The Brenodi CV's front wheels will look all screwed up; dont worry, this will correct itself in-game.
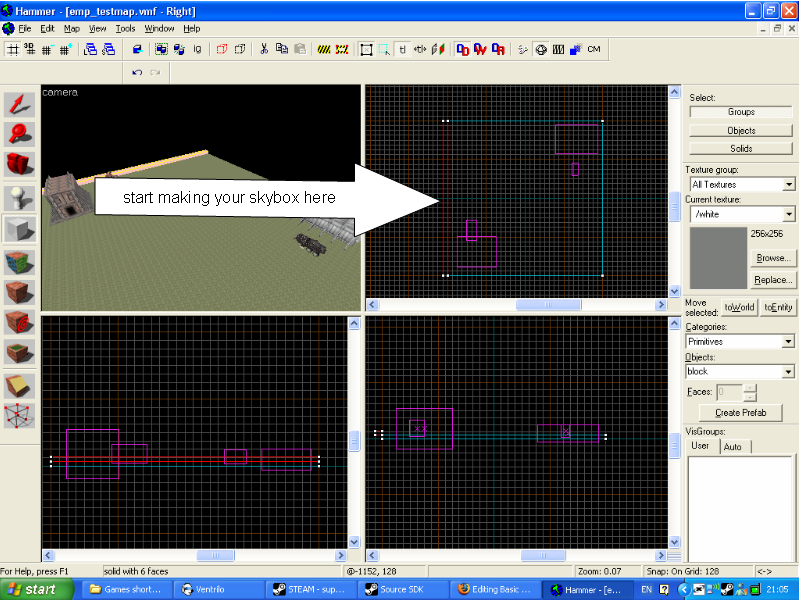
13. The next thing to now do is to make the sky box. For this tutorial we are going to be using a 2D skybox, as this is much simpler than a 3D one. Effectively all we are going to do is use the block tool to make a box around the map, and use the skybox tool texture on it to turn it into sky. I find it best to start making this from the edge of our map in the top view.
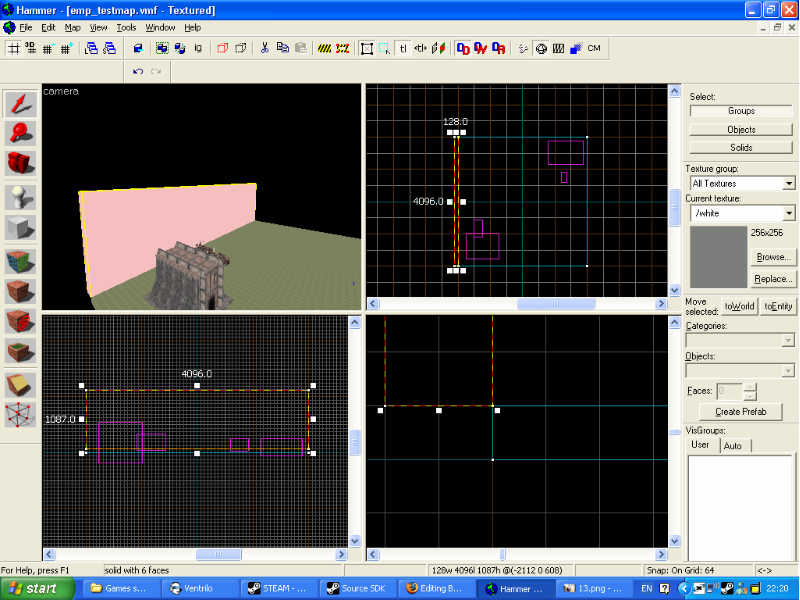
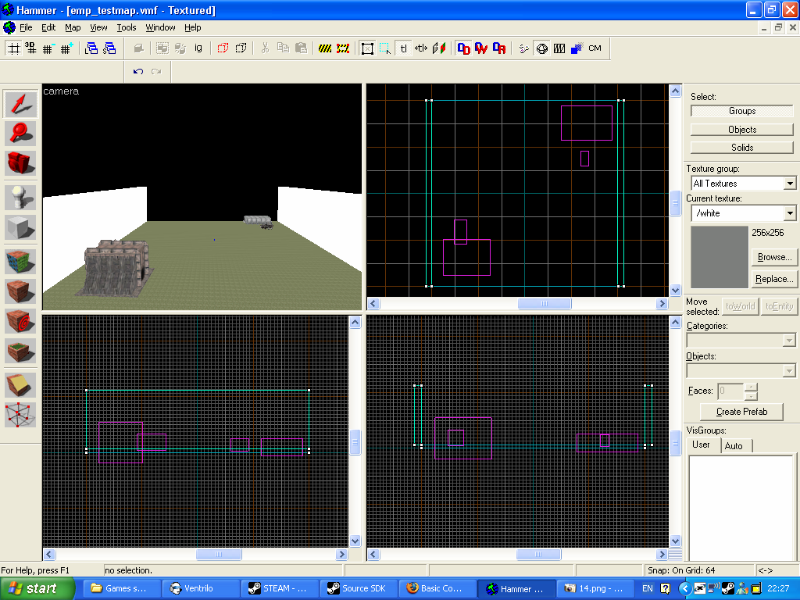
14. Now you have one side of your skybox (untextured) but it is not the right height so you need to go into a different 2D view and begin resizing it. I would say that about 1087 units high would be enough, but keep in mind that the commander can only move inside this box. If it's too short, his view of the battle will be severely limited. Also remember that when making these bits it sometimes helps you later on to have blocks meet at corners rather then edges (as shown in bottem right 2D view).
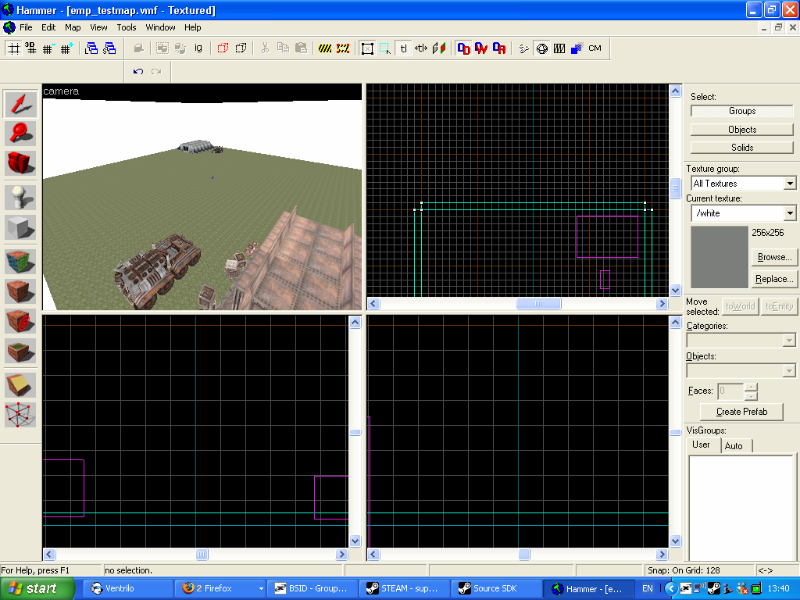
15. I think its a good time to tell you how to copy a block as this comes in useful when doing lots of brushwork. To copy a block, all you have to do is select it and drag it with your mouse in a 2D view whilst holding the shift key. Try doing this with the block we made in step 13. Also you can delete blocks you have made by selecting them and pressing the 'delete key'
16. Now do the same with the other two sides.
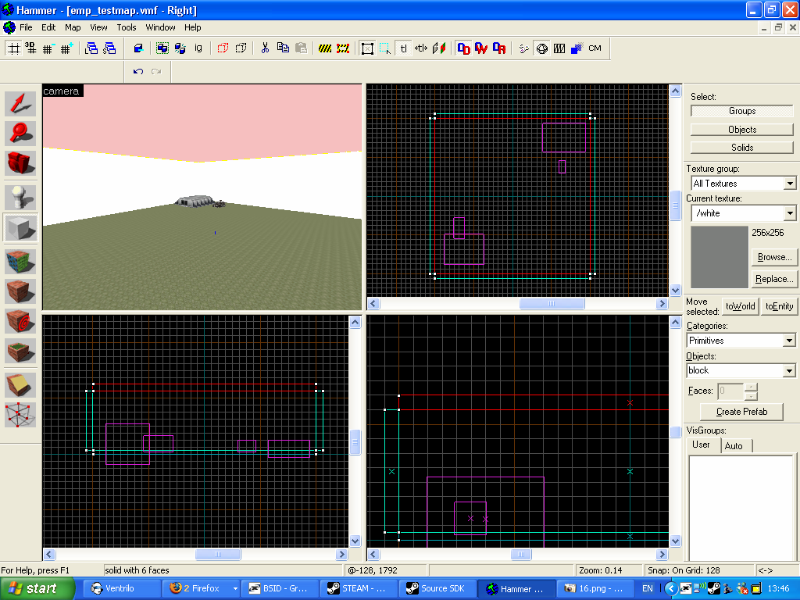
17. Now we need to add a ceiling, start by dragging a box in the top 2D view the same size and shape as the floor then bring it up to meet the corners of the side of your map.
18. You will want to texture the ceiling and the walls, texture them as skyboxes this is done in the same way as how we textured the floor only you use the skybox texture search 'skybox' or 'tools' to find it.
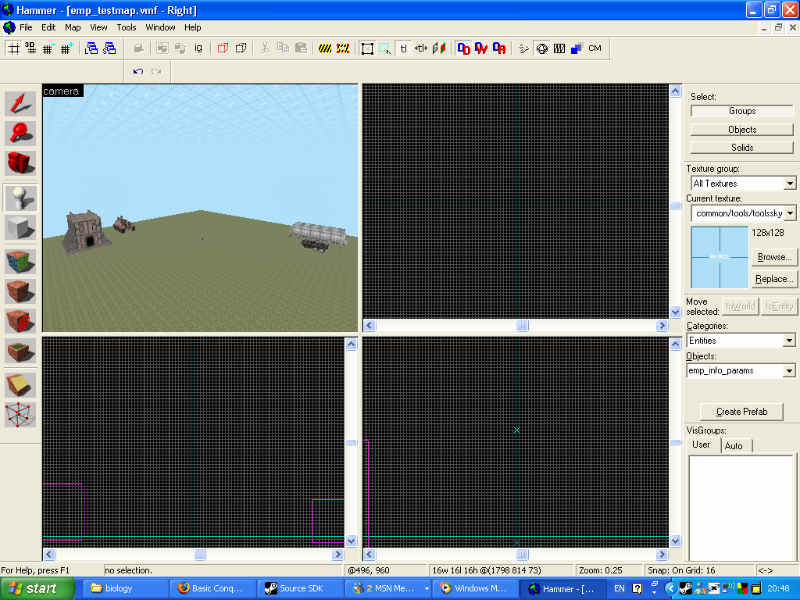
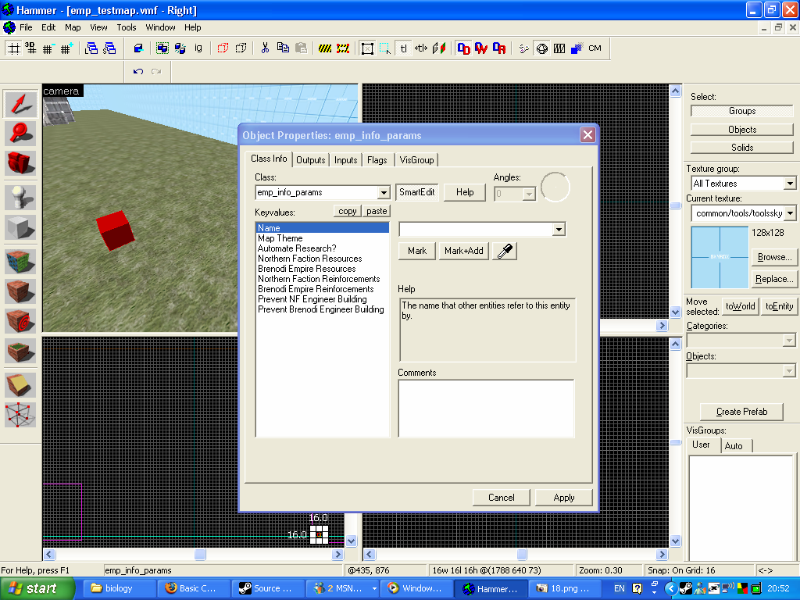
19. Next we need to add 'Emp_info_params' this a entity that tells hammer how many resources each team starts with, how many reinforcements each team has and various other things. When you place it it should appear as a red cube when selected and a purple cube when not selected. To edit the propities of it double click it in the 3D view. (Dont forget if you want to play this map set the resources quite high as resource nodes are not in this tutorial)
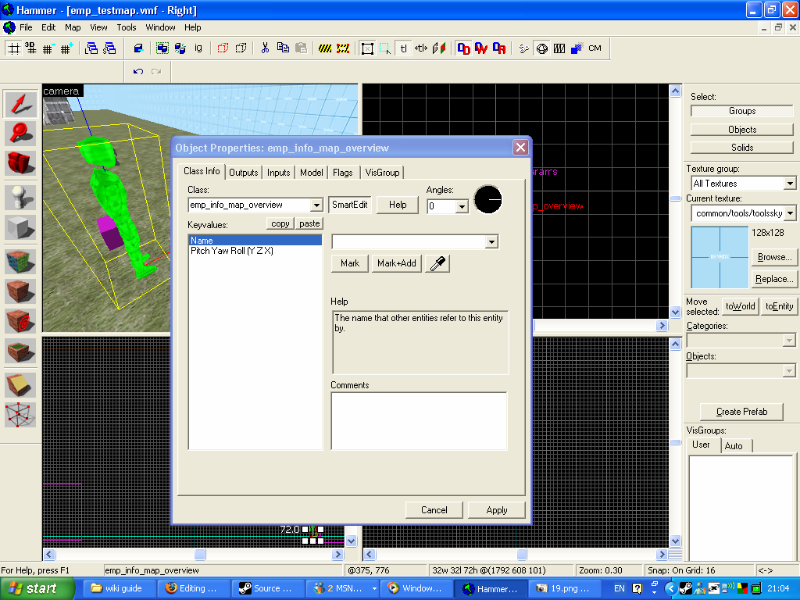
20. Lastly we need to add 'emp_info_map_overview' this is also a entity and is selected in the same way as 'Emp_info_params'
21. BONUS: Add an 'info_node' entity, so servers hosting your map don't need to generate AI node graphs.
22. Dont forget that to play your map go to file- runmap and hit ok to compile! Have fun!
end of tutorial
Tutorial made by supaste with special thanks to Broccoli and other people who did corrections for me (add your name if i missed you)
